Skip to content

Archive for

5 Steps to a Welcoming Entry

Halloween has come and gone and Thanksgiving is rapidly approaching.

Were your adorable pint-sized neighbors be delightfully spooked by the cobwebs that you artfully draped on your porch?

Or freaked out by the peeling, warped woodwork and the dripping awning you haven’t quite gotten around to repairing?

vanzanten-2

And has it occurred to you that your mother-in-law will be climbing your entry stairs come November with her arms full of holiday groceries and a laser-eye focused on your less-than-level front stoop?

Don’t they deserve a warmer welcome?

Here are 5 easy updates our Carpenter on Call Team can tackle for you to refresh your home’s entry:

1. Ditch the Drafty Door. Is your door sticking? Whistling? Warping? Tuning up the operation of your entry door can make a huge difference to your family’s comfort and the first impression your guests receive.

Easy Update: Replace your front door hardware and adjust your hinges to eliminate any sticking, squeaking or drafts.

Z019072

While you are updating, why don’t you choose some period appropriate reproduction hardware to both improve function and add a bit of style?

Z001758

Wow Factor: For a real facelift, replace your old door with a new custom entry system from Arciform’s sister company, Versatile Wood Products.

Arciform owner/designer Anne De Wolf recommends converting to a dutch door to let those elusive Portland summer breezes in (without letting the dogs out).

Dutch-door-tradtional-home

While you are updating, why not add a transom window above the door?

319-TRADITIONAL-PLANK-DOOR-_-TRANSOM

Or some sidelites to add  a bit of style?

316-ROUND-TOP-ENTRY-DOOR-SYSTEM

2. Keep it Cozy. A comfortable guest is a happy guest.

How can you add to their comfort before they even make it through the door?

c93181fa79f2142b9088686558f603b9

A simple built-in bench can add charm and provide a comfortable resting spot.

480121_10151399930046140_1451662255_n

Have a bit more of a budget to spend? Protect your guests while they wait at your door by adding an awning over your entry.

3. Safety Check. An untimely slip on a wet front stoop can really wreck your family’s holiday spirit.

Now’s the time to make a few essential safety improvements.

before pictures 778

Repair and repaint iffy railings and steps to make them level, sturdy and slip resistant.

4. Pretty-Up Your Post. Make your postman smile every time they drop off the mail by matching your mail system to the style and era of your home.

HHP052405

A vintage mail slot cover could be just the thing…

asdf1

Don’t have a mail slot? Arciform designer Kristyn Bester recommends adding a handsome wall-mounted mail box.

mailboxes

5. Accessorize. When you are at a party, the right accessory can really help you stand out from the crowd. The same is true of your entry. Here are a few sleek finishing touches to help your house stand out on the block.

Sparkling New House Numbers

housenumbersB

A Charming Vintage Door Bell

$T2eC16JHJFsFFSQJ7RohBRlThcZJvw~~60_57

A Flag Pole

install-flagpole-x

Or follow the lead of one pair of recent Arciform clients who commissioned a custom-fabricated door knocker with their family name engraved on it…

1181d6b0-2164-40e4-97f2-5c8c45bae3a6_1000

But whatever you do, make it personal. Your entryway should reflect who you are and what you value.

Ranchel_1978_Exterior_A_1_W (11)

Arciform client Nancy Ranchel wants every guest to feel like they have arrived at a tropical island. Bright colors and clever integration of salvage materials put her guests into a festive frame of mind before they ever walk through the door.

However you choose to create a more welcoming first impression, Arciform’s Carpenter on Call Team will be happy to handle all the technical details . Email mike@arciform.com to get started on your own entry update and Happy Holidays from all of us at Arciform!

Explore the Arciform Photo Galleries | About Arciform | Schedule a Design Consultation

Mary Poppins Inspires Rooftop Boat Hatch

We like to say that if our clients dream it, we can do it.

Recently, we had the opportunity to put that idea to the test when a client requested a VERY unusual rooftop accessory:

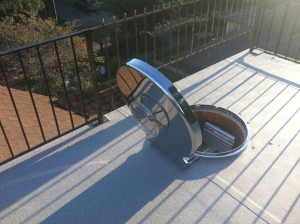
 A custom fabricated stainless steel boat hatch.

Admiral boom 1

The Inspiration: Our clients loved the scene at the beginning of Mary Poppins where Admiral Boom shouts hello from his crazy nautical rooftop widow’s walk. They loved the view from their own roof, and they wondered: Could they have a roof deck like that? And if so, how would it be accessed?

Arciform owner and designer Anne De Wolf suggested they borrow a solution from her own coastal cabin: install a boat hatch.

Hardison_1902_Dormer (6)

The challenge: Most boat hatches are designed for circumstances where all of the surrounding materials are waterproof and water tight. If a little water falls into the cabin below, that’s considered part of life on a boat.

By contrast, this hatch was going to open into a wood paneled reading loft… and it wouldn’t work for that room to get drizzled on each time the hatch was opened.

Hardison_1902_Dormer (11)

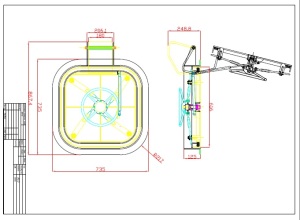
The Solution: Arciform Project Manager Spencer Fransway did significant research to find a company that would custom fabricate the hatch to unusual specifications that would force any rooftop water away from the hole. After much searching, a firm in Taiwan whose primary business is in outfitting luxury yachts agreed to take on the project.

hatch drawing

A Few Hiccups Along the Way

Communicating with Taiwan across a language barrier, separated by two oceans and several time zones created the some of the biggest challenges.

Many late night conversations and early morning draft revisions were exchanged to get the details of the hatch exactly right.

Along the way, Spencer lost sleep repeatedly, wondering:

Were the specs clear enough? Were there logistical elements we weren’t considering? Is this Taiwanese firm going to be able to meet our clients’ exacting standards?

Spencer sweated every detail.

Then we waited… and checked… and waited….and checked…  and waited for the hatch to be fabricated.

While we waited, a few other cool features of the rooftop deck and the reading loft were installed…

hardison 001

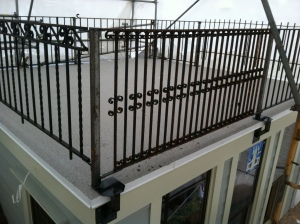
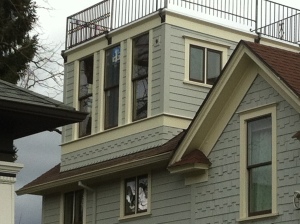
Some salvaged railings were added to the roof deck create that nautical  “Admiral Boom” look.

Hardison_1902_Dormer_D_ (27)

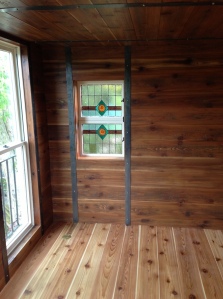
In the reading loft below, some very cool metal strapping was applied to hand milled plank flooring and walls to give the loft a bit of a pirate’s treasure chest vibe.

Hardison_1902_Dormer_D_ (23)

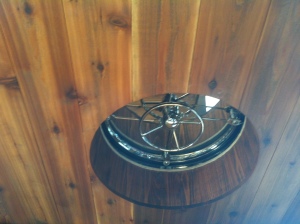
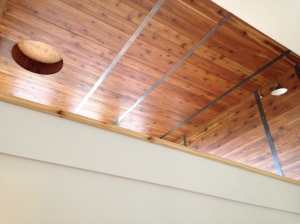
The ceiling  was finished, sealed and polished and the hole for the hatch was prepped to receive the hatch.

At last, when all the people involved in the design and ordering of the hatch had begun to worry that it might never be completed (the whole thing took about 8 months from initial concept to installation)… the hatch arrived!

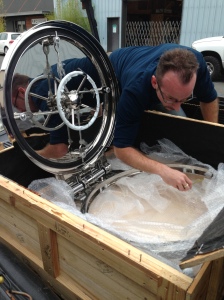
Hardison_1902_Dormer_SubmarineHatch_D_1Here is Arciform draftsman and purchaser Bradley Horne getting ready to pull the hatch from its shipping crate.

Next Step: How to Get it to the Roof?

The hatch weighed about 200 lbs, making it a two person project to lift it up the multiple flights of stairs. Getting it to the deck required  actually removing a window and shimmying it out onto the roof, where the hatch was secured with a rope and dead lifted the remaining few feet.

Hardison_1902_Dormer_D_ (33)

Luckily, the hatch fit perfectly into the hole waiting to receive it, and the installation was a breeze.

Thinking about installing your own roof hatch?

Spencer has a few recommendations based on this experience:

“Be aware that the lead time is a big factor,” explains Spencer. “Working with a custom fabricator from another country allowed for a lot of creative freedom but also added communication challenges and significant time delays. Also, consider incorporating a boat designer in the initial design phase. Boats and houses are built quite differently, and it will help to have a little nautical expertise involved in the design decisions.”

In the end, the result is utterly delightful… and perfectly in keeping with this family’s quirky and creative approach to home design.

What wild hair ideas do you have for your own home? Spencer can’t wait to get started making your dreams a reality…

Just as soon as he’s gotten caught up on his sleep.

Explore the Arciform Photo Galleries | All About Arciform | Schedule a Design Consultation

Kitchen Makeover Update: The Devil in the Details

redlined-document-300x199

In every successful renovation project, the day comes when all the plans, goals, dreams and priorities have to be tied to some hard costs. That’s when the wish list gets vetted to see what’s practical, what’s affordable, and what needs to be deferred to a future project.

Whatever the scale of a renovation, this final balance between what would be ideal and what the budget will bear can be an instructive but challenging stage in the life cycle of a project.

For our Kitchen Makeover Contest winners, the budget for many of the items on their wish list was outlined by our contest collaborators… from the sink and plumbing fixtures provided by George Morlan to the cabinets provided by Versatile Wood Products to the tile provided by Oregon Tile and Marble.

Other necessary aspects of the project were not included in the original contest contributions, and important decisions had to be made about how to best meet the client’s needs in those areas at a cost that will work for them.

Thanks to generous additional contributions from some new contest collaborators (like Advanced Heating and Cooling,  Mastertek Electric, Power Plumbing, Eclipse Drywall and Building Specialites) and the contribution of some elbow grease by our makeover winners themselves, the end result is a beautiful and practical renovation plan that begins construction today!

Here’s how we got there:

The Dining Room/Kitchen Transition

CC 3

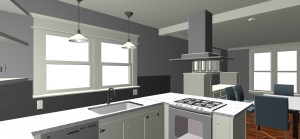
The Dream: To open up the north wall of the kitchen to the dining room, removing an obsolete chimney  and adding some counter/eating space in the pass through area. Open shelving would be added along the wall to increase storage. A sleek low profile range hood would be added to maximize the new open feeling between the kitchen and dining room.

The Challenges: The cost of demolition can be expensive (especially for the chimney), and the changes to the gas supply lines and venting ducts for the new range hood would require modifications to the HVAC system. The original contest parameters did not include an HVAC partner, a drywall partner or a new range hood.

The Revision: Thanks to a generous contribution from Advanced Heating and Cooling and Eclipse Drywall, we were able to pull the cost of the HVAC modifications and the wall removal down significantly. The client has offered to take on the demolition of the north side of the dining room wall and the deconstruction of the chimney as a DIY project, reserving the more technical aspects of the wall modification for our experienced carpenters.

The Result: The client’s most important goal (to open the kitchen up the the gorgeous views of downtown and the river) has been conserved thanks to contributions from the client, their community and our project partners.

The Cabinets

CC 2

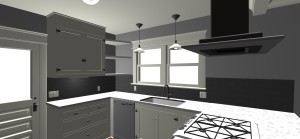
The Dream:  To maximize storage potential in a small amount of square footage by replacing the existing cabinets with new cabinets that have a vintage look but increased storage and functionality.

The Challenge:  The combined costs to remove and install complete new upper and lower cabinets will blow the budget available for that line item.

The Revisions: If we keep and refurbish the existing lower cabinets and match them with new full inset upper cabinets that will reuse the existing hardware, we can dramatically lower the cost of the cabinet portion of the project, freeing up budget for other areas. Other small cabinet elements (like a planned spice cabinet for the east-facing wall) can be deferred to a future project stage if needed after the client has had an opportunity to settle in to the new space.

The Result: The client will get improved storage and functionality in their upper cabinets while reserving some of the charming elements of their existing kitchen with improved function at a more practical cost.

The Pantry

CC 4

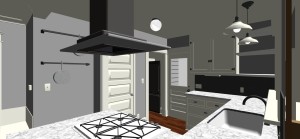
The Dream: An expanded pantry area with built in storage and recycling options, a new slimmer fridge and an integrated nook for the microwave to make the most of a tight space.

The Challenge: Adding a microwave nook would require the re-routing of pre-existing plumbing lines that were tucked in the walls behind the pantry area. This is a common issue that can drive up the cost of renovation in older homes: uncovering what is lurking behind the walls can make what seems like a simple design solution surprisingly complex to execute.

The Revision: The microwave will stay housed on existing shelving units, which will receive a fresh coat of paint. The client will reserve the addition of new recycling station furniture for a future phase of the project.

The Result: A slimmer fridge  and coordinating microwave from Standard TV and Appliance will add space to the pantry and a flexible temporary shelving solution will buy the client time to plan for a second phase of updates to the pantry storage area at a later date.

With a firm focus on the client’s most important priorities, increased generosity from new and existing contest partners and some sharp pencils from our design, construction and estimating teams, we are thrilled to have arrived at a kitchen makeover plan that will work well for everyone.

What’s Next: Construction Begins!

Later this week we’ll take a look at the job site as it launches and discuss some common questions that come up during kitchen renovations, like: Where will my existing appliances go? How will you keep the construction mess to a minimum? How will I know who to expect in my home each day?

We look forward to continuing this journey with you and we want to thank our contest winners Monica and Derek for opening their home to this big adventure!

Explore More with these Previous Kitchen Makeover Posts:

Design Phase

Meet the Makeover Winners

Announcing the Winner

Makeover Contest Finalists

Explore the Arciform Photo Galleries | All About Arciform | Schedule a Design Consultation

Thanks again to our Small Kitchen Makeover Contest Partners:

Basic CMYK

emc_r1_c2

CZ Becker logo

Wall to Wall Stone Corp

George Morlan logo

OTMlogo_print-side-by-side

Schoolhouse Electric logo

Standard TV logo

versatilesinglelogo