Skip to content

Posts tagged ‘Kitchen Makeover’

Kitchen Makeover: The Big Reveal

We couldn’t be more excited to show of the final results of our Portland Monthly Kitchen Makeover.

Ready?

2A2B2141

Before we go farther… Let’s take a look back at where we began.

Remember this?

Cifelli_Chan_1912_Kitchen_Cabs_B_ (3)

Thanks to thoughtful design from Arciform Senior Designer Chelly Wentworth it now it looks like this:

2A2B2014These new upper cabinets and open corner shelving were provided by Versatile Wood Products and installed by the Arciform team. Isn’t it amazing what a fresh coat of paint can do to highlight the gorgeous original millwork details and transform the look of a space?

Next: Remember this?
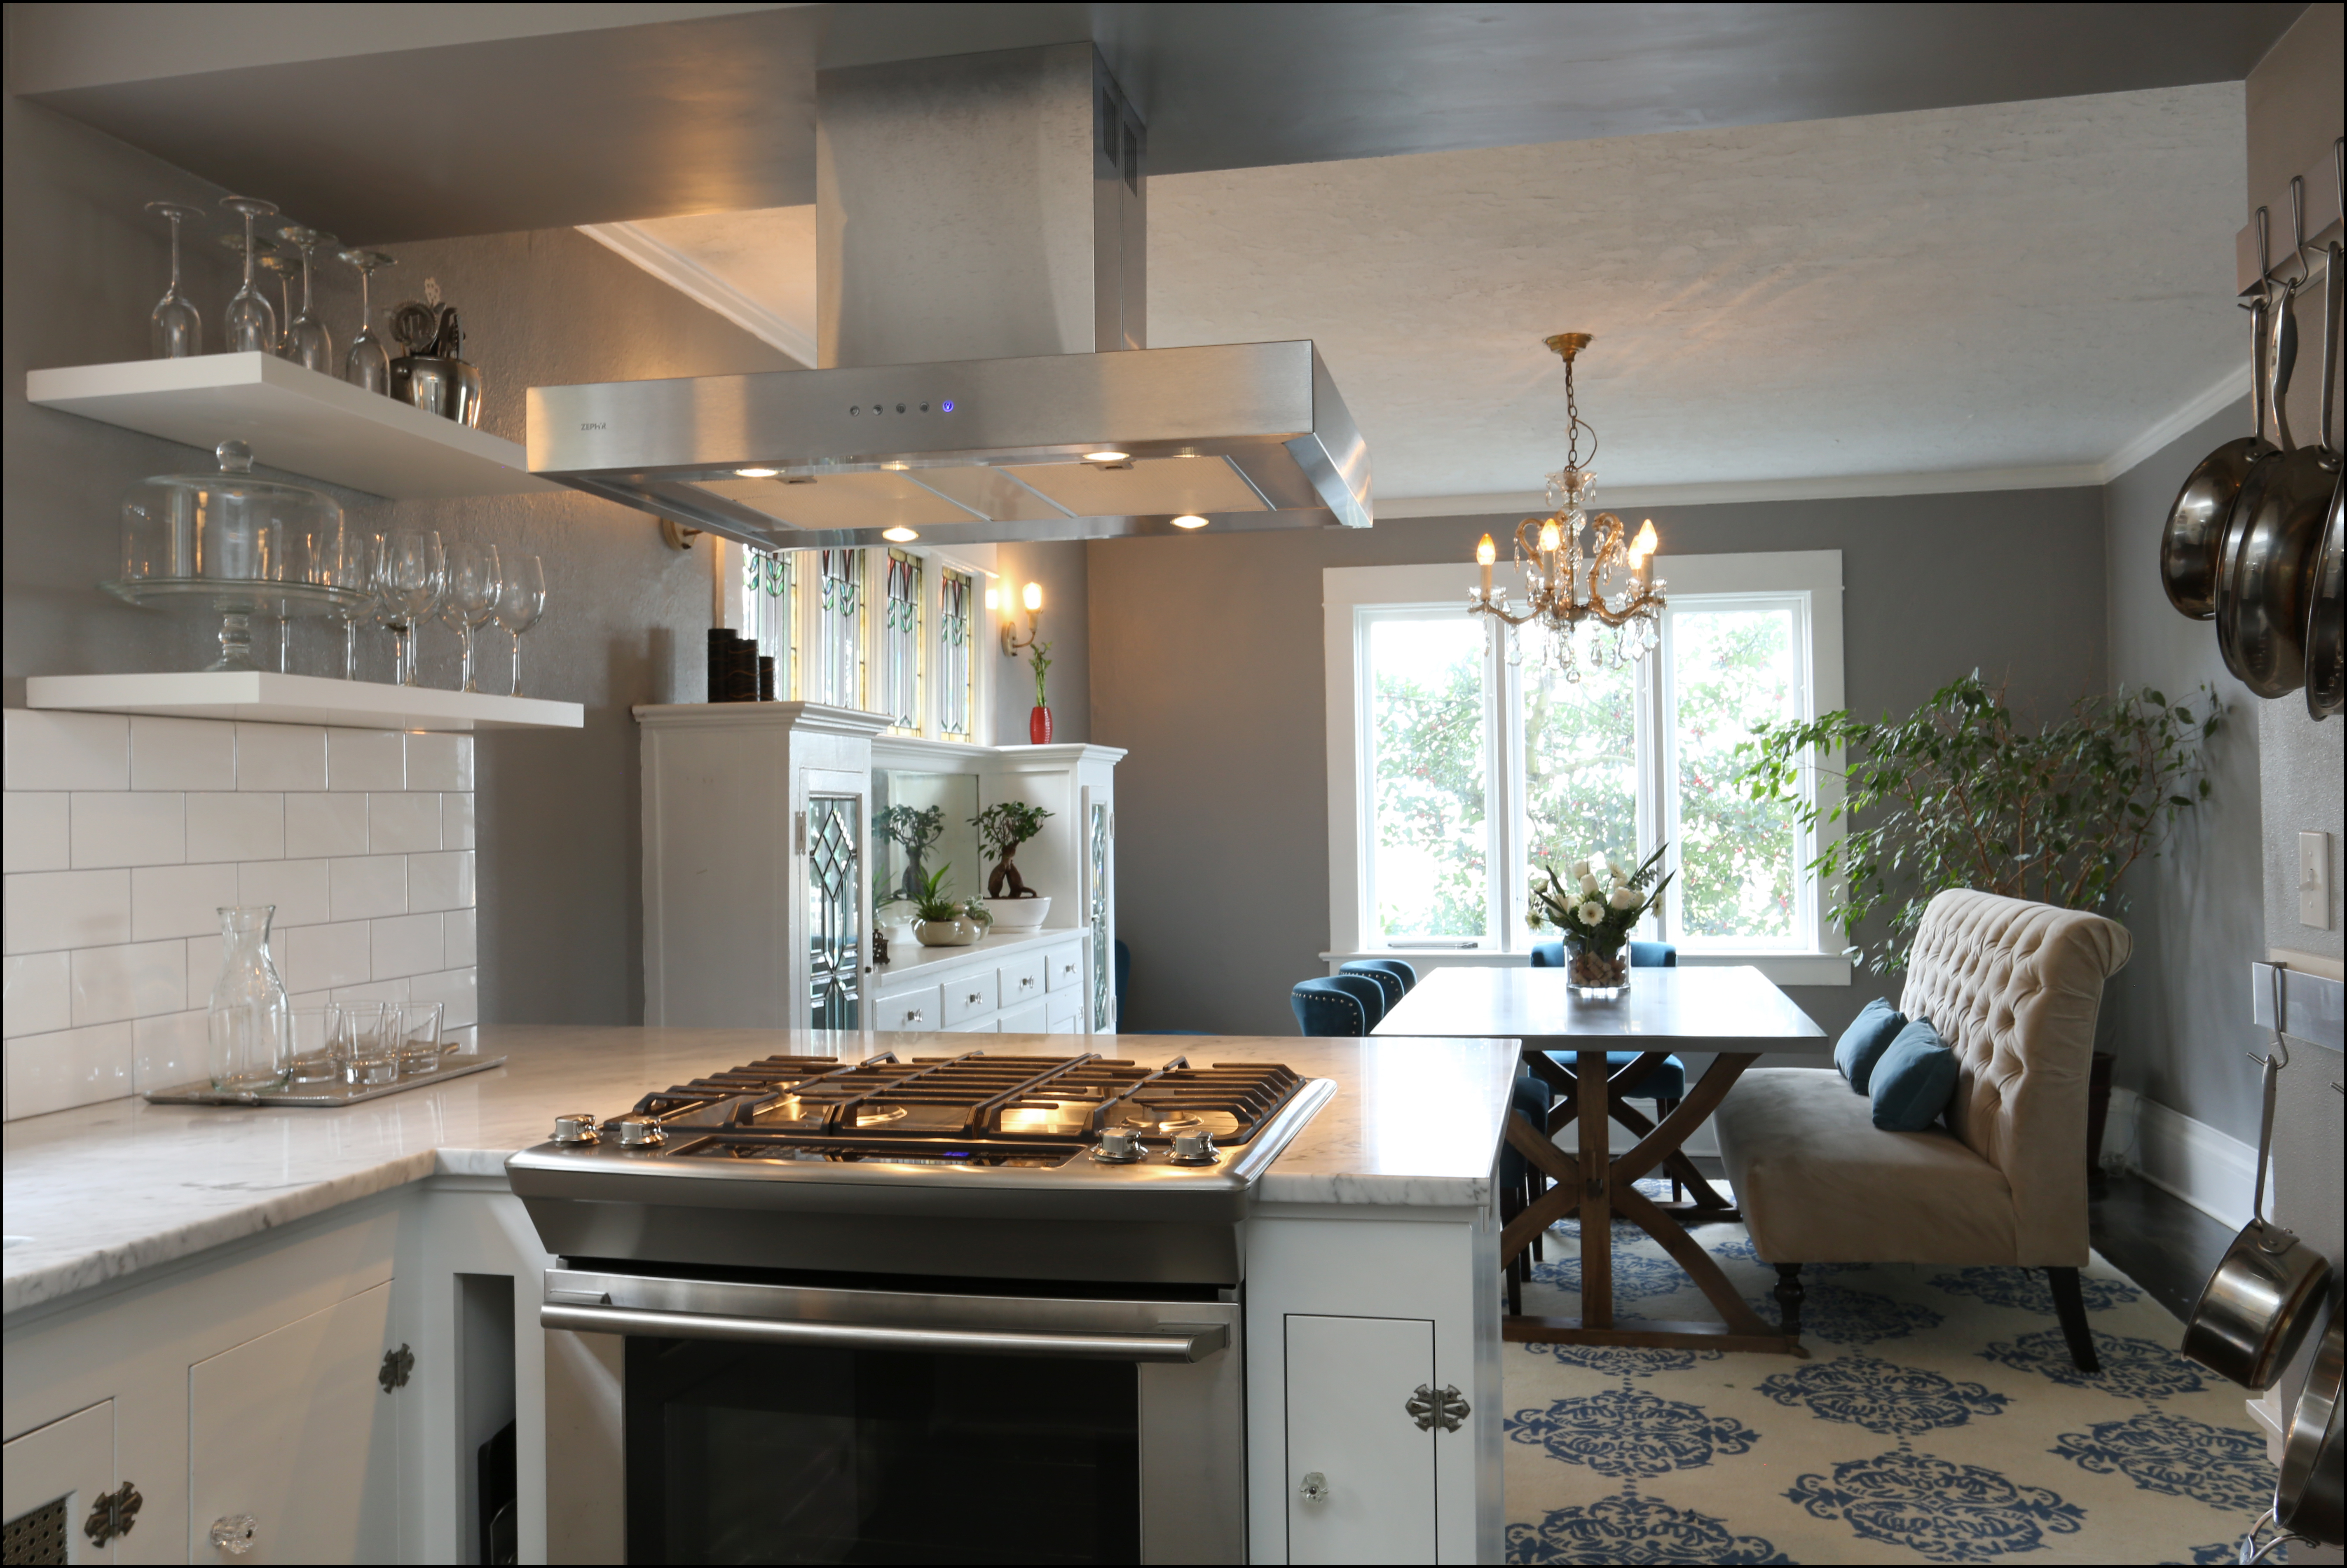
Cifelli_Chan_1912_Kitchen_Range_B_ (2)

Now there’s this:

2A2B2136The new range and range hood are both from Standard TV and Appliance and the peninsula cabinetry and open shelving is by Versatile Wood Products. The larger than average beam across the  opening conceals needed venting for the range hood provided by Advanced Heating and Cooling. The clients saved costs by doing some of the demolition of the existing chimney and the wall themselves.

That beautiful Carrara marble countertop is thanks to Oregon Tile and Marble, with expert installation by Wall to Wall Stone Corp.

And this…

Cifelli_Chan_1912_Kitchen_Sink_B_ (3)

Now looks like this:

2A2B2156

Thanks to George Morlan Plumbing  for the undermount sink and new sink fixture and Power Plumbing for the additional plumbing parts. Oregon Tile and Marble provided the beautiful subway tile backsplash. The new hardwood flooring was contributed by Emerson Hardwoods and installed by the excellent CZ Becker. Arciform was delighted to be able to save the existing lower cabinets with their charming original hardware and mesh detail.

And let’s not forget that this:

Cifelli_Chan_1912_DiningRm_B_6

Now looks like this:

2A2B2090

Here’s a few of the details we particularly love:

2A2B2003

The simple stainless of the pot racks picks up the stainless steel of their new fridge.

2A2B2180

The timeless lighting fixtures from Schoolhouse Electric add grace without distracting from the clean lines of the kitchen. We’re grateful to Master Tech Electric for coming in during the estimating process with an additional donation to support the cost of getting these beautiful new fixtures installed.

2A2B2099

The breakfast bar incorporated the new wine fridge, a key client priority, and the corbels beneath the marble bar subtly reference the beautiful existing built in dining room cabinetry. Emerson Hardwoods and CZ Becker did an amazing job of exactly matching the color of the existing dining room floor, extending it into the kitchen to make the whole space feel continuous.

2A2B2136

We are so honored to help this young couple create a timeless and beautiful space to cook and entertain for years to come.

Ready to start your own small kitchen makeover? Email spencer@arciform.com to schedule your own Initial Design Consultation.

Explore More with these Previous Kitchen Makeover Posts:

Finishing Things Up

Making Progress

Ready, Set, Launch!

Contract Revisions: The Devil in the Details

Design Phase

Meet the Makeover Winners

Announcing the Winner

Makeover Contest Finalists

Explore the Arciform Photo Galleries | All About Arciform | Schedule a Design Consultation

Thanks again to our Small Kitchen Makeover Contest Partners:

Basic CMYK

emc_r1_c2

CZ Becker logo

Wall to Wall Stone Corp

George Morlan logo

OTMlogo_print-side-by-side

Schoolhouse Electric logo

Standard TV logo

versatilesinglelogo

Kitchen Makeover: Finishing Things Up

IMG_2013

We’re getting close to the finish line on our Kitchen Makeover project, making rapid progress on installing the fixtures and finishes that make the transformation complete.

The wine fridge (a major client priority) has been installed into the kitchen’s new peninsula, along with the new stove and range hood from Standard TV and Appliance. The gorgeous new Carrara marble counters from Oregon Tile and Marble have been installed by Wall to Wall Stone Corp.

IMG_2011

The new grey undermount sink and faucet from George Morlan Plumbing has been installed along a new compact dishwasher that has been integrated into the existing lower cabinets (always a tricky process in an older home).

Below the sink you can see where the charming original doors have been saved and refreshed with a new coat of paint to match the new upper cabinets.

You can also see the beautiful new floors contributed by Emerson Hardwood Floors and installed by CZ Becker, creating an exact match for the existing flooring in the adjacent dining room.

The final touches will include installing the subway tile backsplash, a wall mounted pot rack for their pots and pans and two sets of floating shelves to display their glassware and dishes within easy reach.

We’re so excited to see the project come together and we look forward to sharing the results with all of you!

Explore More with these Previous Kitchen Makeover Posts:

Making Progress

Ready, Set, Launch!

Contract Revisions: The Devil in the Details

Design Phase

Meet the Makeover Winners

Announcing the Winner

Makeover Contest Finalists

Explore the Arciform Photo Galleries | All About Arciform | Schedule a Design Consultation

Thanks again to our Small Kitchen Makeover Contest Partners:

Basic CMYK

emc_r1_c2

CZ Becker logo

Wall to Wall Stone Corp

George Morlan logo

OTMlogo_print-side-by-side

Schoolhouse Electric logo

Standard TV logo

versatilesinglelogo

Makeover Kitchen: Making Progress!

We’ve got some great pictures from the field as our Kitchen Makeover reaches its midway point.

Here’s a quick progress update:

The demolition phase has wrapped up, with the existing upper cabinets removed and the walls opened up where necessary to add in needed wiring:

IMG_1786

This is always a scary part of the process… when you start thinking, “WHAT HAVE I DONE?” and “WILL I EVER HAVE A WORKING SINK AGAIN?”

Sometimes during demolition we have some surprises!

IMG_1787

It’s not uncommon to discover previously unsuspected dry rot or portions of old timbers that are in need of removal and repair.

Sometimes we discover water damage, and sometimes we discover that a wall has a more complex role in the weight distribution of the house than was initially estimated.

For this project, we elected to add in a stronger beam above the new pennisula to make sure the floor above had ample support.

IMG_1805

While the walls are open, our electricians from Master Tech installed the wiring for the new light fixtures from Schoolhouse Electric.

IMG_2933

Then the painters work their magic, making everything clean and white and bright.

IMG_1902

Some cool details start showing up, like the elegant corbels (the curvy shaped bracket things you see above) that will hold up the Carrara marble counter on their peninsula.

heating register

Check out how the original heating register has been stripped and cleaned up and freshly painted.

Part of the fun of this particular renovation is the way we have been able to save many of the cool historic details (like the heating register) while improving the way the kitchen functions and fits in with the rest of the house.

IMG_1901

This is also the time when we start prepping for  all of the final finishes and fixtures get installed.

Above  you can see one of our colleagues at Wall to Wall Tile and Stone creating a template that will be used to guide the fabrication of the Carrara marble counter top.

Did you know: In older houses, hardly anything is square and straight so each cabinet and surface needs to be carefully adjusted to compensate the various places where the walls or floor are a bit out of level or out of plumb.

When you are dealing with an expensive one-of-a-kind piece of stone, it is very important that the fabricators have an opportunity to create a template that will exactly fit the existing space (wonky corners and all).

IMG_1905

Here’s a look at the template in progress.

Next up: Sinks, appliances, back splashes, light fixtures and cabinets get installed and the project nears the finish line.

We can’t wait to see the results of the generous contributions from George Morlan Plumbing, Versatile Wood Products, Standard TV and Appliance, Schoolhouse Electric and Oregon Tile and Marble when they get installed later this month!

Explore More with these Previous Kitchen Makeover Posts:

Ready, Set, Launch!

Contract Revisions: The Devil in the Details

Design Phase

Meet the Makeover Winners

Announcing the Winner

Makeover Contest Finalists

Explore the Arciform Photo Galleries | All About Arciform | Schedule a Design Consultation

Thanks again to our Small Kitchen Makeover Contest Partners:

Basic CMYK

emc_r1_c2

CZ Becker logo

Wall to Wall Stone Corp

George Morlan logo

OTMlogo_print-side-by-side

Schoolhouse Electric logo

Standard TV logo

versatilesinglelogo

Kitchen Makeover: Ready, Set, Launch!

Contracts are signed, designs are complete, and now it is time to for our Kitchen Makeover winners to get real about the fact that there is about to be a big hole where their kitchen used to be!

Cifelli chan 012

Before each construction project begins, Arciform Project Manager Scott Mumma (pictured, center right) likes to sit down with the designer, client services manager and the client to address some of their frequently asked questions about the remodeling process and how it will impact their daily lives.

For Makeover winners Darrick and Monica, the first question was about how they would handle their own daily routine with a hole where there kitchen used to be.

IMG_1773

To address that, Scott recommends that the fridge, microwave and pantry essentials be moved to a nearby location out of the path of the construction team. Derek and Monica have elected to use a portion of their living room as their temporary kitchen. The team puts down floor coverings throughout the temporary kitchen area (and along every path from the entrance to the construction area) to protect the home from dust and damage during the renovation process.

Cifelli chan 007

Scott then introduces them to the Job Box, which includes a set of documents that will be used to track the progress of the job from beginning to end.

The job box includes reminders about lead safety techniques, checklists to ensure all necessary items have been completed at each critical stage of the project and a copy of the contract for reference by the client and the construction team as questions come up throughout the construction process.

One cool feature: The job box also contains weekly progress reports that give both managers and carpenters the opportunity to document issues, discoveries and concerns that may need to be addressed before the next week’s work begins.

IMG_1769

Next Scott works with the client to determine how all waste material and chemicals will be handled during the demolition and construction phase.

Locations are identified for where trash and recycling materials will be stored and picked up (check out the orange dumpster in front of their entry stairs) and where paint equipment and other materials can be safely rinsed and cleaned at the end of the work day. Arciform routinely re-captures as much of the waste stream as possible, with each week’s debris sorted into re-useable, recyclable, compostable and burnable subcategories and returned to the Arciform shop for appropriate storage or disposal.

IMG_1788

The last step is to identify what elements of the demolition will be the client’s responsibility before construction begins.

In this case, our contest winners have taken on the removal of the existing chimney stack and the demolition of the drywall from the wall that is being removed. You can see the results of that demo above.

Already, the whole space feels lighter and brighter!

From there, the project is off and running- literally. The whole team is looking forward to getting a great workout running up and down those entry stairs during the project.

Next Up: Surprise! Expecting the Unexpected During Construction

Explore More with these Previous Kitchen Makeover Posts:

Contract Revisions: The Devil in the Details

Design Phase

Meet the Makeover Winners

Announcing the Winner

Makeover Contest Finalists

Explore the Arciform Photo Galleries | All About Arciform | Schedule a Design Consultation

Thanks again to our Small Kitchen Makeover Contest Partners:

Basic CMYK

emc_r1_c2

CZ Becker logo

Wall to Wall Stone Corp

George Morlan logo

OTMlogo_print-side-by-side

Schoolhouse Electric logo

Standard TV logo

versatilesinglelogo

Kitchen Makeover Update: The Devil in the Details

redlined-document-300x199

In every successful renovation project, the day comes when all the plans, goals, dreams and priorities have to be tied to some hard costs. That’s when the wish list gets vetted to see what’s practical, what’s affordable, and what needs to be deferred to a future project.

Whatever the scale of a renovation, this final balance between what would be ideal and what the budget will bear can be an instructive but challenging stage in the life cycle of a project.

For our Kitchen Makeover Contest winners, the budget for many of the items on their wish list was outlined by our contest collaborators… from the sink and plumbing fixtures provided by George Morlan to the cabinets provided by Versatile Wood Products to the tile provided by Oregon Tile and Marble.

Other necessary aspects of the project were not included in the original contest contributions, and important decisions had to be made about how to best meet the client’s needs in those areas at a cost that will work for them.

Thanks to generous additional contributions from some new contest collaborators (like Advanced Heating and Cooling,  Mastertek Electric, Power Plumbing, Eclipse Drywall and Building Specialites) and the contribution of some elbow grease by our makeover winners themselves, the end result is a beautiful and practical renovation plan that begins construction today!

Here’s how we got there:

The Dining Room/Kitchen Transition

CC 3

The Dream: To open up the north wall of the kitchen to the dining room, removing an obsolete chimney  and adding some counter/eating space in the pass through area. Open shelving would be added along the wall to increase storage. A sleek low profile range hood would be added to maximize the new open feeling between the kitchen and dining room.

The Challenges: The cost of demolition can be expensive (especially for the chimney), and the changes to the gas supply lines and venting ducts for the new range hood would require modifications to the HVAC system. The original contest parameters did not include an HVAC partner, a drywall partner or a new range hood.

The Revision: Thanks to a generous contribution from Advanced Heating and Cooling and Eclipse Drywall, we were able to pull the cost of the HVAC modifications and the wall removal down significantly. The client has offered to take on the demolition of the north side of the dining room wall and the deconstruction of the chimney as a DIY project, reserving the more technical aspects of the wall modification for our experienced carpenters.

The Result: The client’s most important goal (to open the kitchen up the the gorgeous views of downtown and the river) has been conserved thanks to contributions from the client, their community and our project partners.

The Cabinets

CC 2

The Dream:  To maximize storage potential in a small amount of square footage by replacing the existing cabinets with new cabinets that have a vintage look but increased storage and functionality.

The Challenge:  The combined costs to remove and install complete new upper and lower cabinets will blow the budget available for that line item.

The Revisions: If we keep and refurbish the existing lower cabinets and match them with new full inset upper cabinets that will reuse the existing hardware, we can dramatically lower the cost of the cabinet portion of the project, freeing up budget for other areas. Other small cabinet elements (like a planned spice cabinet for the east-facing wall) can be deferred to a future project stage if needed after the client has had an opportunity to settle in to the new space.

The Result: The client will get improved storage and functionality in their upper cabinets while reserving some of the charming elements of their existing kitchen with improved function at a more practical cost.

The Pantry

CC 4

The Dream: An expanded pantry area with built in storage and recycling options, a new slimmer fridge and an integrated nook for the microwave to make the most of a tight space.

The Challenge: Adding a microwave nook would require the re-routing of pre-existing plumbing lines that were tucked in the walls behind the pantry area. This is a common issue that can drive up the cost of renovation in older homes: uncovering what is lurking behind the walls can make what seems like a simple design solution surprisingly complex to execute.

The Revision: The microwave will stay housed on existing shelving units, which will receive a fresh coat of paint. The client will reserve the addition of new recycling station furniture for a future phase of the project.

The Result: A slimmer fridge  and coordinating microwave from Standard TV and Appliance will add space to the pantry and a flexible temporary shelving solution will buy the client time to plan for a second phase of updates to the pantry storage area at a later date.

With a firm focus on the client’s most important priorities, increased generosity from new and existing contest partners and some sharp pencils from our design, construction and estimating teams, we are thrilled to have arrived at a kitchen makeover plan that will work well for everyone.

What’s Next: Construction Begins!

Later this week we’ll take a look at the job site as it launches and discuss some common questions that come up during kitchen renovations, like: Where will my existing appliances go? How will you keep the construction mess to a minimum? How will I know who to expect in my home each day?

We look forward to continuing this journey with you and we want to thank our contest winners Monica and Derek for opening their home to this big adventure!

Explore More with these Previous Kitchen Makeover Posts:

Design Phase

Meet the Makeover Winners

Announcing the Winner

Makeover Contest Finalists

Explore the Arciform Photo Galleries | All About Arciform | Schedule a Design Consultation

Thanks again to our Small Kitchen Makeover Contest Partners:

Basic CMYK

emc_r1_c2

CZ Becker logo

Wall to Wall Stone Corp

George Morlan logo

OTMlogo_print-side-by-side

Schoolhouse Electric logo

Standard TV logo

versatilesinglelogo

Peek Behind the Scenes at our Small Kitchen Makeover in Progress

414

We’re delighted to introduce you to Darrick, the Portland homeowner who worked so hard to win our recent Small Kitchen Makeover Contest in collaboration with Portland Monthly.

Darrick and his wife Monica gathered an impressive group of friends and fans to help drive their kitchen to the top of the voting. They built a list of people who received daily text messages reminding them to vote and even worked with Darrick’s sister-in-law, a volleyball coach, to engage the entire volleyball league in rooting for and voting for their kitchen.

Of course, now that they’ve won, there are thousands of delighted friends and family members hoping to follow the progress of their kitchen design and help them celebrate their success.

For that reason, Darrick and Monica have given Arciform permission to follow their project from start to finish on our blog, providing insights along the way into the kitchen remodeling process that might be useful for anyone considering a kitchen remodel.

IMG_2307

About the Home

The back of Darrick and Monica’s home nestles up against the hill face, with the back kitchen door opening out to nearly scrape the rocks of the hillside behind them. It’s a beautiful space, full of 1920s charm, and a big change from the Beaverton condo Darrick lived in before they married.

IMG_2224

Darrick’s dad is an experienced DIY remodeler, and the couple gave the home an overall facelift with fresh coats of crisp white and grey paint as soon as they moved in.

Monica Cifelli

The only space they left completely untouched was the kitchen, a tiny space with  narrow counters and extremely tall upper cabinets that were built in place along one wall on site and a tiny pantry that houses an awkwardly placed refrigerator.

IMG_2232

About the Designer

For this project, Arciform selected senior designer Chelly Wentworth, a highly experienced designer with numerous awards to her credit and a special affinity for older homes, to work with the couple on the kitchen re-design.

Chelly Head 2

Here are Chelly’s impressions from the first client meeting:

What were the first things you noticed about the Cifelli/Chan kitchen upon arriving into the space?
The kitchen was very small of course,  and mostly original. I am always amazed at how long these original kitchens remain in use.  It felt very cramped and closed off the rest of the house. The colors and finishes didn’t reflect my impression of the homeowner’s style in any way.
IMG_2235
What are the anticipated challenges of the project as you see them?
The refrigerator is currently located in a small pantry which is not ideal and there doesn’t seem to be another place for it to go.

IMG_2252

 Plus, there must be 50 steps up to the home’ s entrance.
411

The location provides great views but can make taking the garbage and recycling out a challenge. Usually when working in a kitchen this small I suggest more frequent trips to the garbage and recycling so we don’t lose valuable storage space to big pull-outs.  With these clients it is not going to be an option.

After our first visit with Darrick, what were the key insights that you got from the conversation that were subsequently incorporated into the first draft of the design?

The #1  priority is to remove the wall between the kitchen and the dining room.

IMG_2228

(Here’s the view towards the kitchen from the dining room)

IMG_2237(And here is the view of the same wall from the kitchen side.)

We are planning to add a peninsula of cabinets that will  provide a place for the range, extra counter space and a small eating bar.  Their design aesthetic leans towards the modern side so key elements in the concept are clean lines and lack of clutter.

When you first meet with a client, what ‘homework’ do you like them to do to help inform the conversation?

I usually ask people to think about all the activities that will be taking place in the kitchen.

For example, do they entertain a lot?

Do they all cook or is there one person who does the primary cooking?

What dietary considerations do they have?

Do the buy a lot of prepackaged meals or make everything from scratch?

How do they shop, do they own any special equipment like a 20” tall juicer, etc?

Does anyone in the household have any special hobbies like canning or beer making that will take place in there?

Do they want seating in the kitchen?

I also ask them to tell me what decisions or selections have already been made and if any of them are set in concrete or if they can be flexible.  For example, many people want double ovens and a microwave (which can be very difficult to accommodate in a small space).  I also ask them to think about what they like and dislike about their current space and if we will be reusing anything that is already there.  Finally, I ask them to gather an idea file so I can get a feel for their style and what types of things they like.

The Wish List

Darrick and Monica are avid wine lovers, tea drinkers and ramen noodle makers with a penchant for the latest technology. When asked what was on their wish list for a dream kitchen, they listed Carrara marble counter tops, a wine fridge to showcase their favorite vintages, a hanging pot rack and a pot filler for the sink. Darrick would love anything that integrates some cool technological elements into the space, but they are careful to be respectful of the home’s vintage character and charm.

They would like the kitchen to feel more open and connected to the rest of the house and they desperately need more storage space and counter space. Finally, they are hoping to create easier access to their fridge.

Next Steps

After Chelly’s initial meeting with Darrick, the next step will be to create the ‘as built’ documentation– an accurate three dimensional rendering of the current layout of the kitchen that will allow her to begin exploring potential solutions to the design challenges presented.

Then, they will meet for a design presentation, where the first draft of the proposed design is reviewed by the clients and refined based on their feedback.

Once a concept has been determined, there will be a “budget check” where a rough estimate of the approved design will be sketched out in order to confirm that the design can be constructed within the client’s budget parameters.

We hope you will follow along with us as we track each step in the process of this makeover and we welcome your questions and feedback along the way!

Next week’s post: The design presentation.

Explore the Arciform Photo Galleries | All About Arciform | Schedule a Design Consultation

Thanks again to our Small Kitchen Makeover Contest Partners:

Basic CMYK

emc_r1_c2

CZ Becker logo

George Morlan logo

Oregon Tile and Marble logo

Schoolhouse Electric logo

Standard TV logo

versatilesinglelogo

Wall to Wall Stone Corp

Help Us Choose Our Small Kitchen Makeover Winner

This month we are partnering with Portland Monthly Magazine to give one Portland resident an Arciform Kitchen makeover.

Thanks to our makeover partners Versatile Wood Cabinets, Schoolhouse Electric, Oregon Tile and Marble, Standard TV and Appliance, George Morlan Plumbing, CZ Becker Floors, Classic Marmo and Emerson Hardwood, the winner is going to receive a kitchen makeover valued at over $25,000.

custom_banner_2059606609971152922.png

We’ve narrowed the entries down from over 130 to just under 20 finalists.

We need YOUR help to pick the winner.

Below you’ll find images from all of the finalists.

Decide which kitchen most needs the makeover and then click over to the Portland Monthly Facebook Page  to cast your vote!

Thanks for your help! We can’t wait to give one lucky Portland area family a refreshed and restored kitchen.

Ross Honeyfield
What a Nightmare!

13’x11.5′

Casey Trimble

1950’s One-Butt Kitchen – Help in Lents District
Approximately 10×8 Dimensions 😦 – Quite small and non-functional for our house of 3 (2 Adults, 1 Toddler). Outdated and in need of help for health and wellness of our home and family. Can’t afford remodel on our own.

Adam MichaudMichaud Rummer Kitchen

10′ w x 15’5″ l

Calvin Rasmussen

50’s Ranch, Galley, Lot of Windows
About 8 feet by 16 to 18 feet

Emee Pumarega

1947 Pink and Blue Kitchen in Need of Remodeling Love!
10’x 12′ approx.
Vote for 1947 Pink and Blue Kitchen Here

Emily Puro

Kitchen Makeover
8.5′ x 13′

Tayah Butler
Courage Kitchen

Owner Tayah Butler says, “8 wide by 13 long- this kitchen has raised three generations of families in north Eugene. Currently a mother and daughter eat, pack lunches, do homework and live every day in the care of this tiny kitchen- she may be old but courage to be her best keeps her giving!

Julie Morgan

It’s a Kitchen! It’s a Laundry Room! It’s Both. 😦
8.5′ x 12.5′

Kathryn Hile

A Little Off
14′ x 10.5′

Kristin WalkerOriginal 1942 Cabinets Have Lost Their Charm
9′ x 7.5′

Linda Conratt
Cook Needs Counter and Storage
It is approximately 127 square feet.  It’s not a true rectangle.
The largest length is 16.5 feet and widest section is 9.75.

Miranda KeenanCute Lil’ Kitchen
8’2″ x 11’6″

Monica CifelliOld Charm in Goose Hollow
Built in 1912, the same year as the titanic, this house presents itself with plenty of original charm. Dark hardwoods can be found throughout the house residing against the original 12 inch white wood trim which is a great contrast to grey walls and the box ceiling in the living room. When we purchased this house, the same family had resided in it for more than 85 years. We took care and effort to paint and upgrade many of the different rooms however the kitchen still remains untouched. We have looked at many of the pictures from Arciform and would consider it a pleasure if you could transform our kitchen.
Dimensions- 8×11

Rich Millward36-Year Old Kitchen Desperately Seeking a Makeover
Avid cook and family of four would love to get our kitchen remodeled. We’ve been in our home for five years with a cooking space that needs a new look. Please help!
Plus we’re tired of cleaning the boys’ spills off the carpet and glueing down the formica.

🙂
Dimensions 10′ x 14′

Sara WesterfeldToo Small, Ugly, and Painful – Help Me!
8′ x 10′

Susan Addy
Stuck in the 50’s- Pink and Ivy
10′ by 15′
Vote for Pink and Ivy Here

You have until April 19th to vote for your favorite.

Thanks for helping us decide!

And thanks again to our contest partners:

emc_r1_c2

CZ Becker logo

George Morlan logo

Oregon Tile and Marble logo

Schoolhouse Electric logo

Standard TV logo

versatilesinglelogo

Explore the Arciform Photo Galleries | All About Arciform | Schedule a Design Consultation